Looks & Color Correction
To apply a look to your shots, tap the Menu Button in the lower left and then tap Looks. Cadrage comes with a selection of pre-defined looks from which you can choose. To change the look preview image, use the buttons on the right. When you are finished, return to the Main View. The selected look is now applied to the Live Image and will also be burned into your photos and videos.
Creating Custom Looks
Cadrage offers powerful professional color correction tools to create custom looks. To start, press + NEW LOOK and select CREATE LOOK. You will now see three color wheels to control LIFT, GAMMA, and GAIN. Press the Slider Button on the right to bring up controls for Saturation, Hue, Brightness, Contrast, Temperature, and Tint.
The preview image will show the current color correction applied. If you would like to see the reference image without the correction, simply tap and hold the image. To reset an individual value, double tap the control element. To reset all values, press the Reset Button. When you are finished, press SAVE and enter a name for your new look.
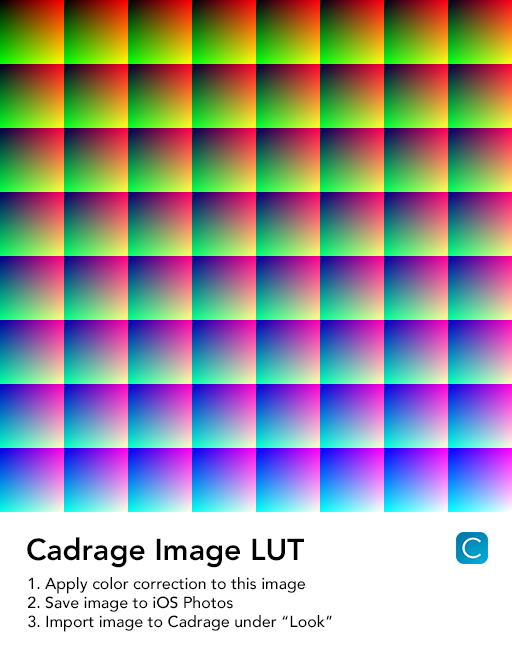
Importing LUTs
To import looks that have been created outside of Cadrage, please first download this LUT Image. It is also available in the app under Export Blank LUT Image. Now use an application of your choice (like Photoshop, DaVinci Resolve or a filter app on your iPhone) to apply your desired look to this image. When finished save it to your iOS Photos. Back in Cadrage press + NEW LOOK in the Look View and select IMPORT LUT. Select the LUT image and the look will be available in Cadrage.
Import via Photoshop
https://www.youtube.com/watch?v=jfigc7hHbNE
Import via DaVinci Resolve
https://www.youtube.com/watch?v=ebjrI4OMxoQ
Download LUT image
Here’s the link to the LUT image: Cadrage Image LUT file
Note: You can also use a standard LUT texture (512x512px) instead of the Cadrage Image LUT file.